
Summit Elevation (m): 2210
Elevation Gain (m): 707 (Up & Down) | 750 (Prairie Creek Loop)
Round Trip Time (hrs): 1.5-6
Total Trip Distance (km): 8 (Up & Down) | 11.2 (Prairie Creek Loop)
Quick ‘n Dirty Rating: Class 2 – you fall, you sprain your ego and go back to bed for the rest of the day.
Difficulty Notes: Easy hiking on a graded and signed trail. The hordes of other people and dogs might be the crux.
Technical Rating: TL3;
GPS Track: Prairie Mountain Main Trail | Prairie Creek Alt Trail
Map: Google Maps
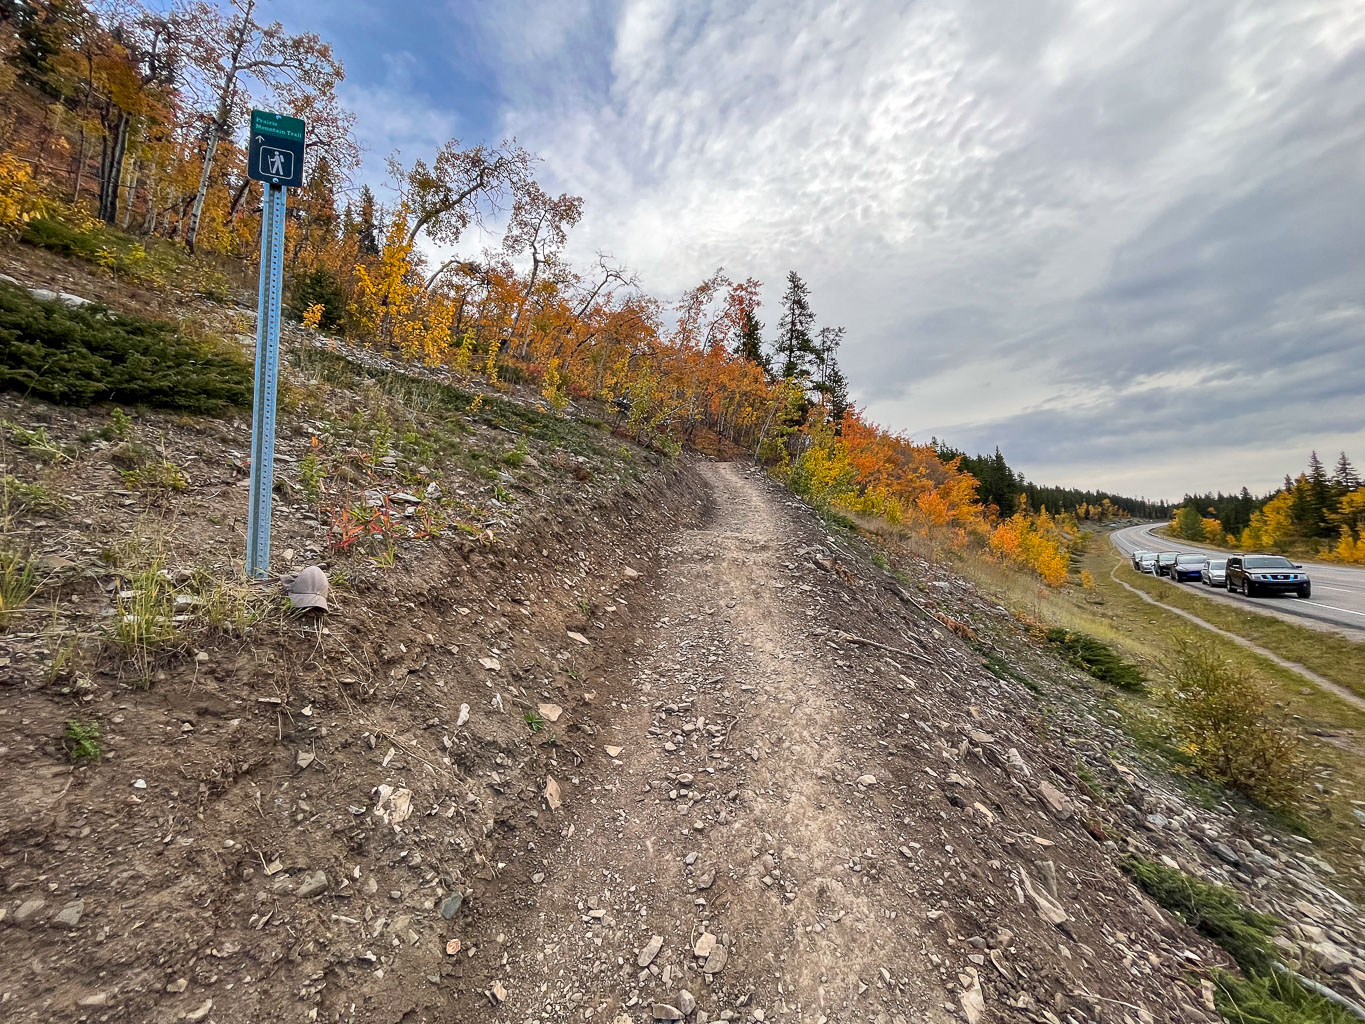
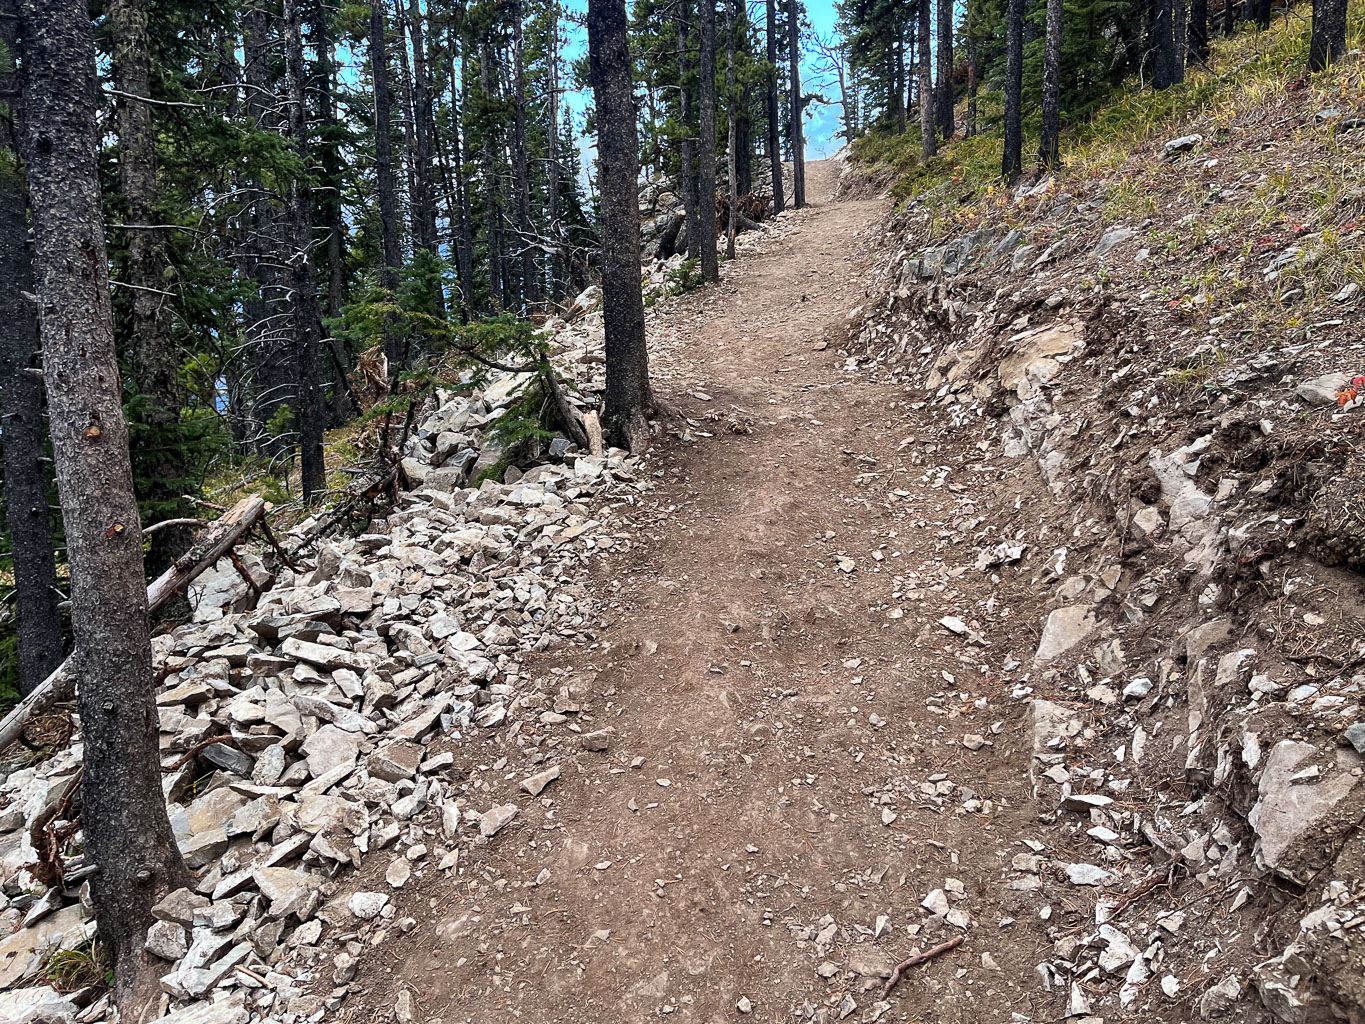
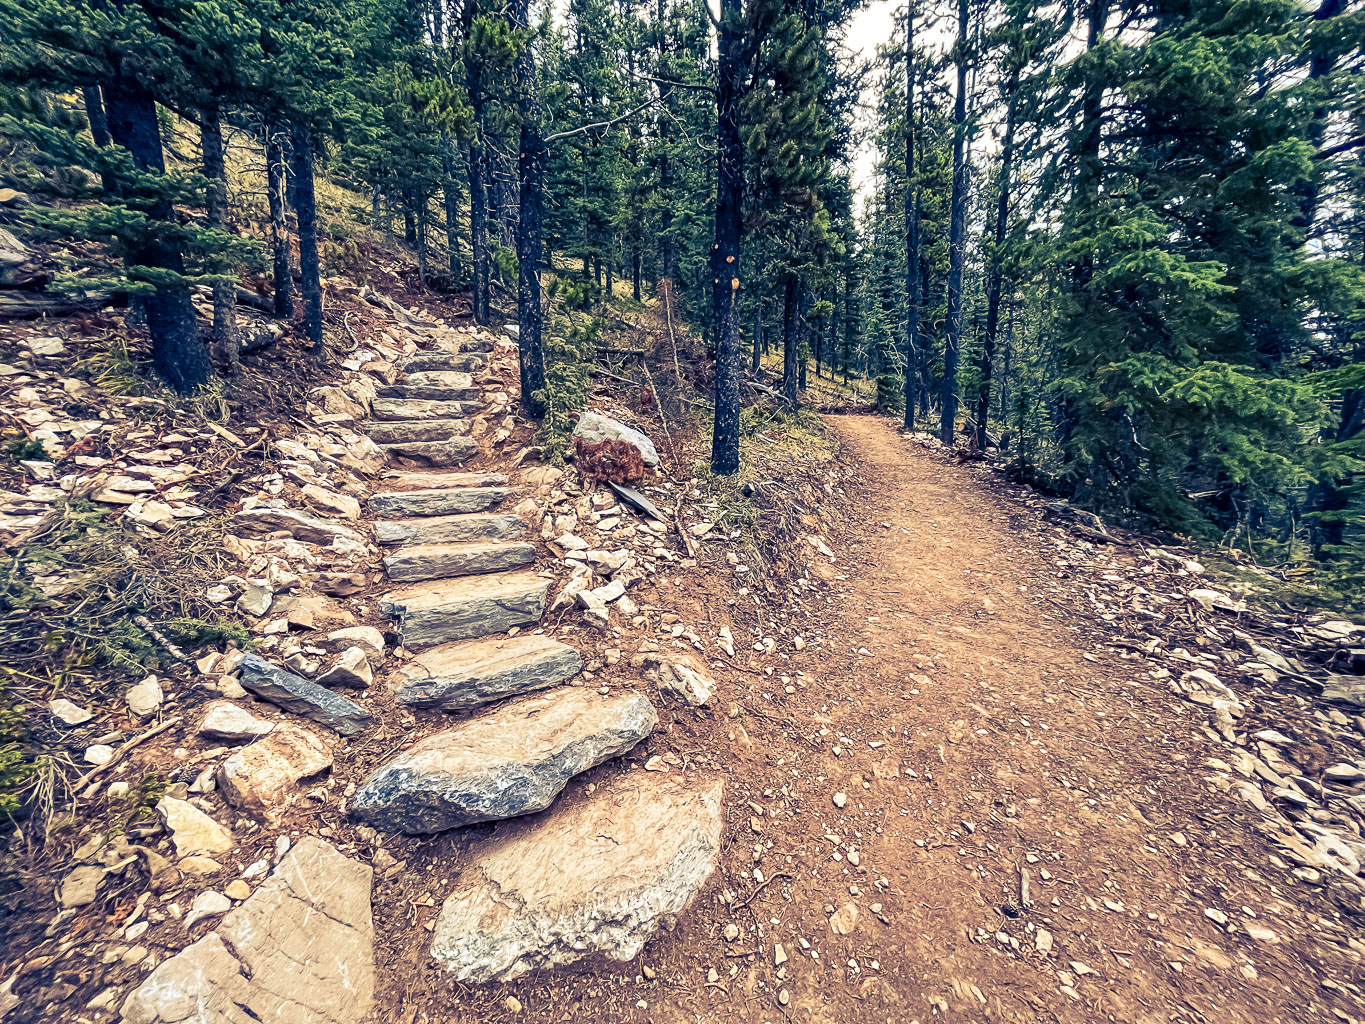
NEW!! – Updated for the repaired and upgraded trail as of September 2023. There have been MAJOR changes to the trail, including the fact that it’s now an official trail with signposts and a very obvious graded, wide track the entire way up. Sections that have changed the most include 1, 3, 4 and 5. What hasn’t changed is that sections 3 through 5 will still kick your butt. 😉 I love the better overall grade of the trail and I love the better drainage and the stone steps that remind me of work that Lawrence Grassi has done elsewhere in the Rockies. A few things that I’ll miss a bit from the old route include views off section 4 (now mostly in forest) and the steep bucket steps in winter on section 5 (now also mostly in forest). The new trail is MUCH safer overall than the old one was, especially in winter except for one short piece on section 6. The trail deviates very close to the edge of a small cliff near treeline where huge cornices can build in winter. Deadfall has been placed to stop folks from going further on-slope but in winter I hope the track is set back from the edge.

As I followed my daughter up Prairie Mountain for her 1st and my 66th time this year, I realized what the world needed. It’s taken me 283 laps with a total of 198,100 vertical meters gained and 1698 kilometers hiked on this silly little mountain since January 2020 to come to this tidbit of cognitive brilliance. I have concluded that the world needs another for Dummies tome. The topic? Glad you asked my friend, glad you asked – but isn’t it rather obvious from the image displayed just above this post? As the title page states in tiny font – please don’t be a dummy. Clearly I have spent way too much time in my own head while hiking for over 500 hours like a modern day Sisyphus, up and down an endless cycle of dull pain and muted pleasure. But here we are and here I am – apparently determined to write this thing and put it out there for the betterment of our small corner of a large and confused world. In this post-truth world of ours, I dare not claim to have any definitive authority or special knowledge on the topics contained herein. Yes, I’ve done plenty of peaks and have put in way too many laps on this particular one, but in the end this is all just one guy’s opinion. You know what they say about opinions and specific parts of our anatomy? That’s exactly right – everyone has one. For what it’s worth.
![]() Pro tip – This dummies page is tongue-in-cheek but if you are new to mountain hiking you should continue reading. Don’t underestimate how easy it is to get in trouble in the Rockies – even on a little peak like Prairie Mountain.
Pro tip – This dummies page is tongue-in-cheek but if you are new to mountain hiking you should continue reading. Don’t underestimate how easy it is to get in trouble in the Rockies – even on a little peak like Prairie Mountain.
Ever since Covid-19 changed the world, Prairie Mountain has morphed into a “Grouse Grind” for the 1.6 million citizens of Calgary. Sitting at 4 kilometers and just over 700 vertical meters above Elbow Falls along Hwy 66, 45 minutes west of Calgary this small peak is seeing an explosion of human traffic. Especially during the fall and winter months, Prairie is the new stairmaster training regimen for those of us allergic to both gyms and stairmasters. On any given day of the week and pretty much at any given time of the day you will find some poor saps huffing and puffing their way up and down Prairie’s SE slopes. Many folks, including myself, do multiple laps in order to maintain fitness through the winter months. Usually I will do a double or triple but I’ve been known to do quads and have done five laps before breakfast. Since my good friend, Wietse, lives near me we often team up and motivate each other to head out on a weekly or twice weekly basis. I have come to expect some or all of the following on my 100’s of laps, even in winter and even in the black of night;
- families (including kids, dogs, babies in carriers etc.)
- bare legs (in winter)
- bare chests (in winter)
- bare bellies (in winter)
- crutches (yes, in winter)
- bikes (pushed up the SE route, usually ridden down Prairie Creek)
- skis
- snowshoes
- sleds
- flip-flops (yes, in winter)
- tank tops (you guessed it, in winter)
- fur coats
- costumes (including on dogs)
- death metal at full volume
- discussions from conspiracies to religion to secularism, advanced physics and biology
As I’ve done more and more laps on Prairie, I recognize and interact with a few dozen regulars who seem to be there no matter the time of day or night. I look forward to meeting the more elderly hikers who motivate me to stay fit well into my 80’s if I have any choice in the matter. But that’s enough chit-chat about myself and the mountain. This is a dummies guide and as such I wanted to write a short article on the do’s and don’ts and tips and tricks for people who might be headed to the mighty Prairie Mountain for the first time.
![]() Pro tip – If you run into a grumpy looking old guy who asks if you know why Jesus was kicked off the hockey team, don’t be alarmed. He tells the same joke to everyone – even people who’ve heard it already on laps 1 and 2. I’ve heard it at least a dozen times. It’s still pretty funny though.
Pro tip – If you run into a grumpy looking old guy who asks if you know why Jesus was kicked off the hockey team, don’t be alarmed. He tells the same joke to everyone – even people who’ve heard it already on laps 1 and 2. I’ve heard it at least a dozen times. It’s still pretty funny though.
One final point before I move on. This is called a “dummies guide” rather than a “beginners guide” for a reason. As a very regular user of this mountain, I have some advice for those who may not realize that they are behaving in ways that degrade the experience of Prairie Mountain for myself and hundreds of other hikers. My advice all comes down to one simple thing in the end. Please. Don’t be a dummy.
Tip #1 – How to Get There (Driving & Parking)
Prairie Mountain sits roughly 45 minutes west of the south end of Calgary along hwy 22, just north of Elbow Falls. In the summer you can park at the Elbow Falls day use area, at the Powderface Creek trailhead or at a small lot along the highway between the Prairie Creek and Powderface Creek trails. Between December 1 and May 14th, Hwy 66 is closed just past Elbow Falls and many folks simply park along the hwy. This may or may not be permitted going forward as the highway is getting very clogged, especially on weekends. This should go without saying but deserves to be said in a dummies book nonetheless – PLEASE USE CAUTION WHEN DRIVING AND WALKING ALONG HWY 66 around the various trailheads. DON’T PARK ON THE HIGHWAY WHEN THE WINTER GATE IS OPEN – use the various parking lots like a rational human being.
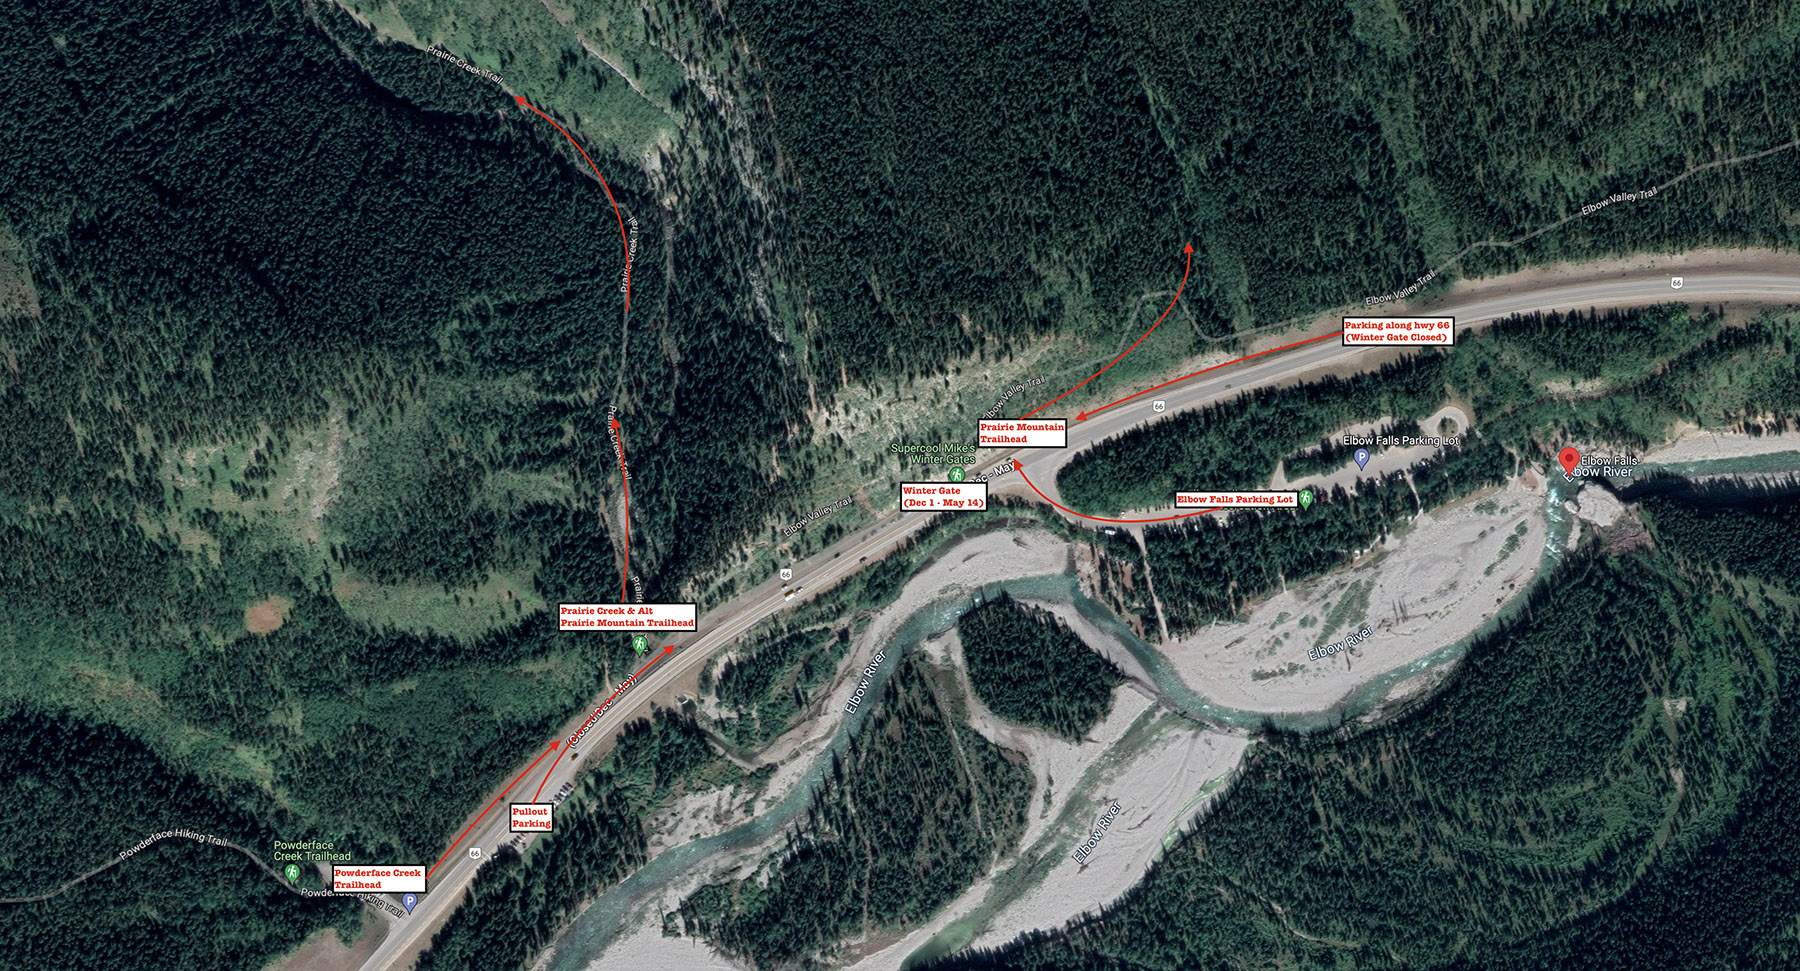
![]() Pro tip – always drive to the gates rather than park 1 kilometer up the road – usually someone’s leaving. Another pro tip is an alternate trailhead further east of the regular ones – see the map. Another tip is obvious – arrive early (before 10:00) or hike later in the day or even at night. One last pro tip for the drive – you are not a logging truck so please don’t drive like one. Some of us have to get back to work before they notice we’re gone.
Pro tip – always drive to the gates rather than park 1 kilometer up the road – usually someone’s leaving. Another pro tip is an alternate trailhead further east of the regular ones – see the map. Another tip is obvious – arrive early (before 10:00) or hike later in the day or even at night. One last pro tip for the drive – you are not a logging truck so please don’t drive like one. Some of us have to get back to work before they notice we’re gone.
The drive can be very icy so caution is required. Especially near Priddis there are a lot of deer alongside the road and they like to cross right in front of you just to ensure you’re awake. Just before dawn and after dusk are the worst times of the day for near-misses and panic attacks. Logging trucks clog up Hwy 22 from the Priddis turn to the Bragg Creek / Hwy 66 junction during the week. Not much you can do about that! There are only 2 safe places to pass slow vehicles once you’re off the divided highway just east of the Priddis turnoff – both are closer to the Bragg Creek junction. Again – early risers or late hikers benefit from a much quieter and safer drive.
Tip #2 – The Routes
There are two routes on Prairie Mountain, the direct route and the longer Prairie Creek option. There are other slight variations but these two will suffice and are the two official ones. Confusingly, there are 4 trailheads marked on the parking and trailhead map above.
- The “Prairie Creek & Alt Prairie Mountain Trailhead” option is a longer and less traveled route that I’ll detail below.
- By far the most popular route on Prairie Mountain is the direct route with its one trailhead option as of the recent trail upgrades. The trailhead option rises directly from Hwy 66 near the Elbow Falls junction, labeled “Prairie Mountain Trailhead” in the satellite image above.
As of the upgrades there are no more reasonable options for hiking this mountain. The maintenance crew did a great job with laying down cut trees and undergrowth over any other old paths. Even in winter these routes will be challenging and even a bit dangerous with all the debris under the snow. As of now I strongly advise you NOT to deviate off of either of the two routes mentioned here. There are objective hazards including cliffs and avalanche slopes on any other routes.
Direct Route
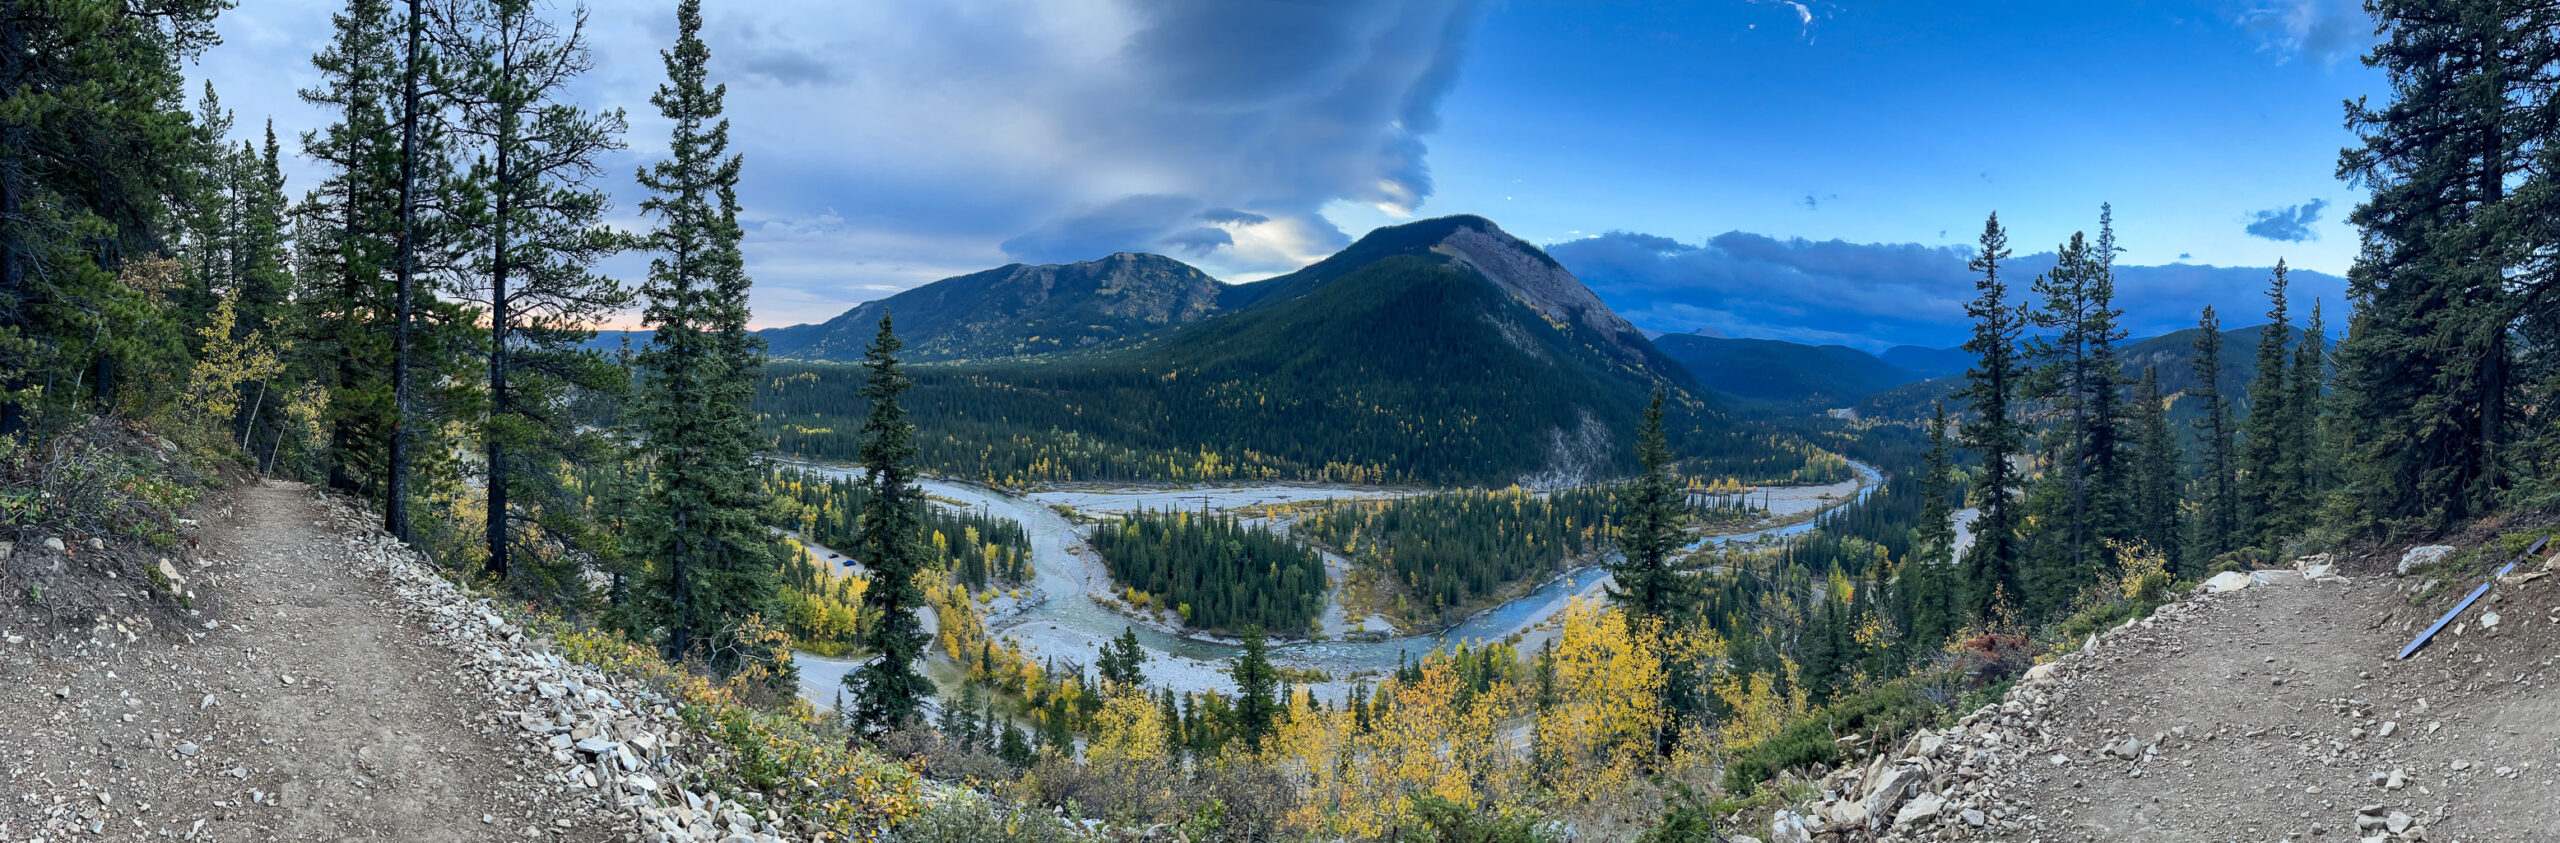
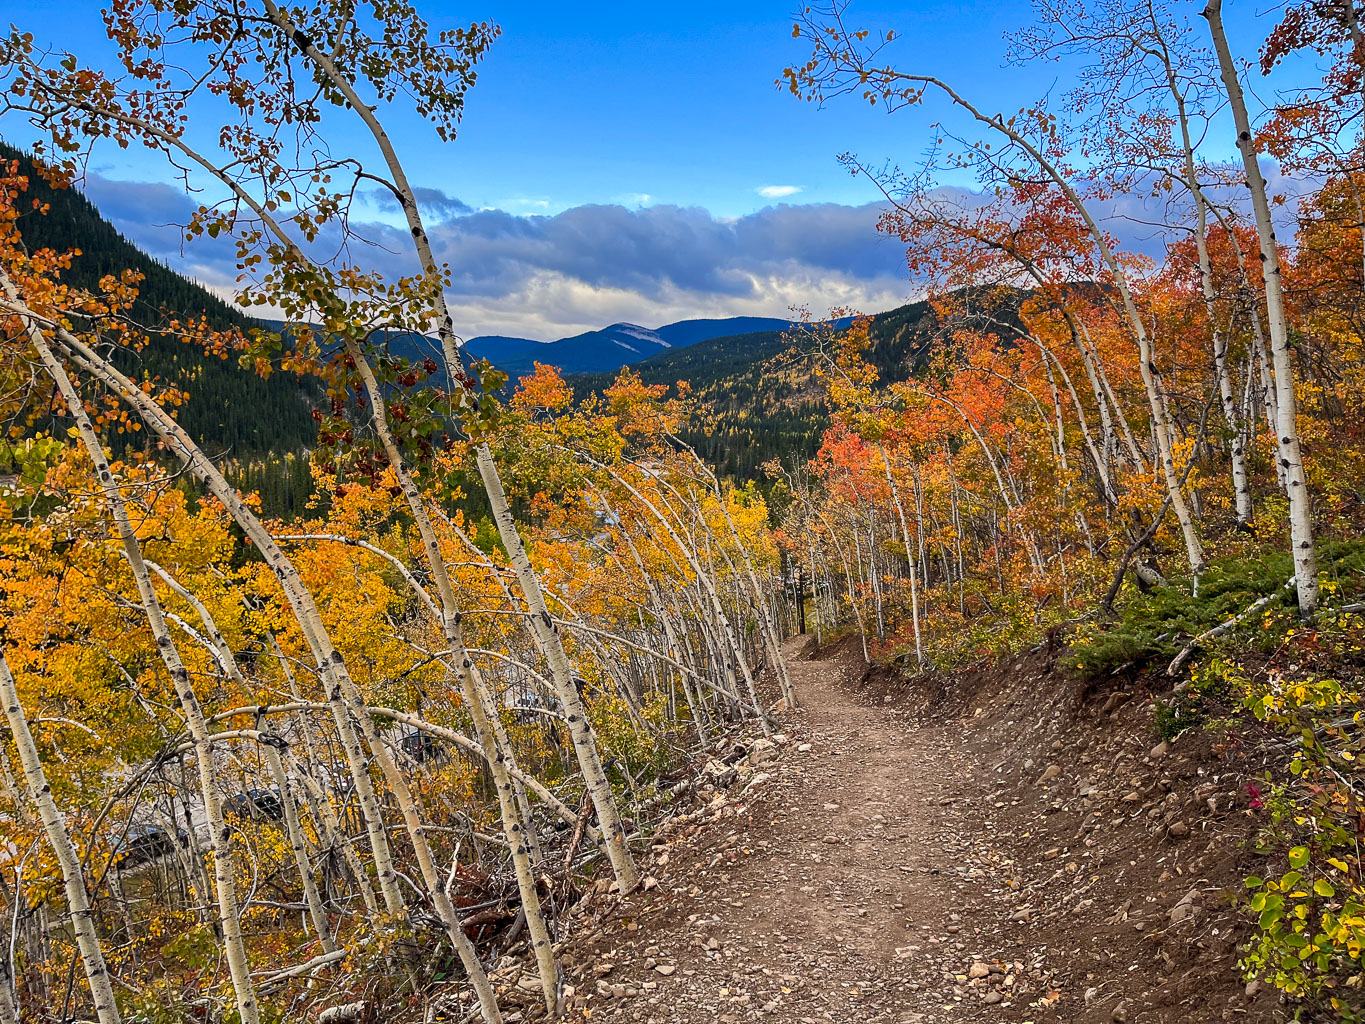
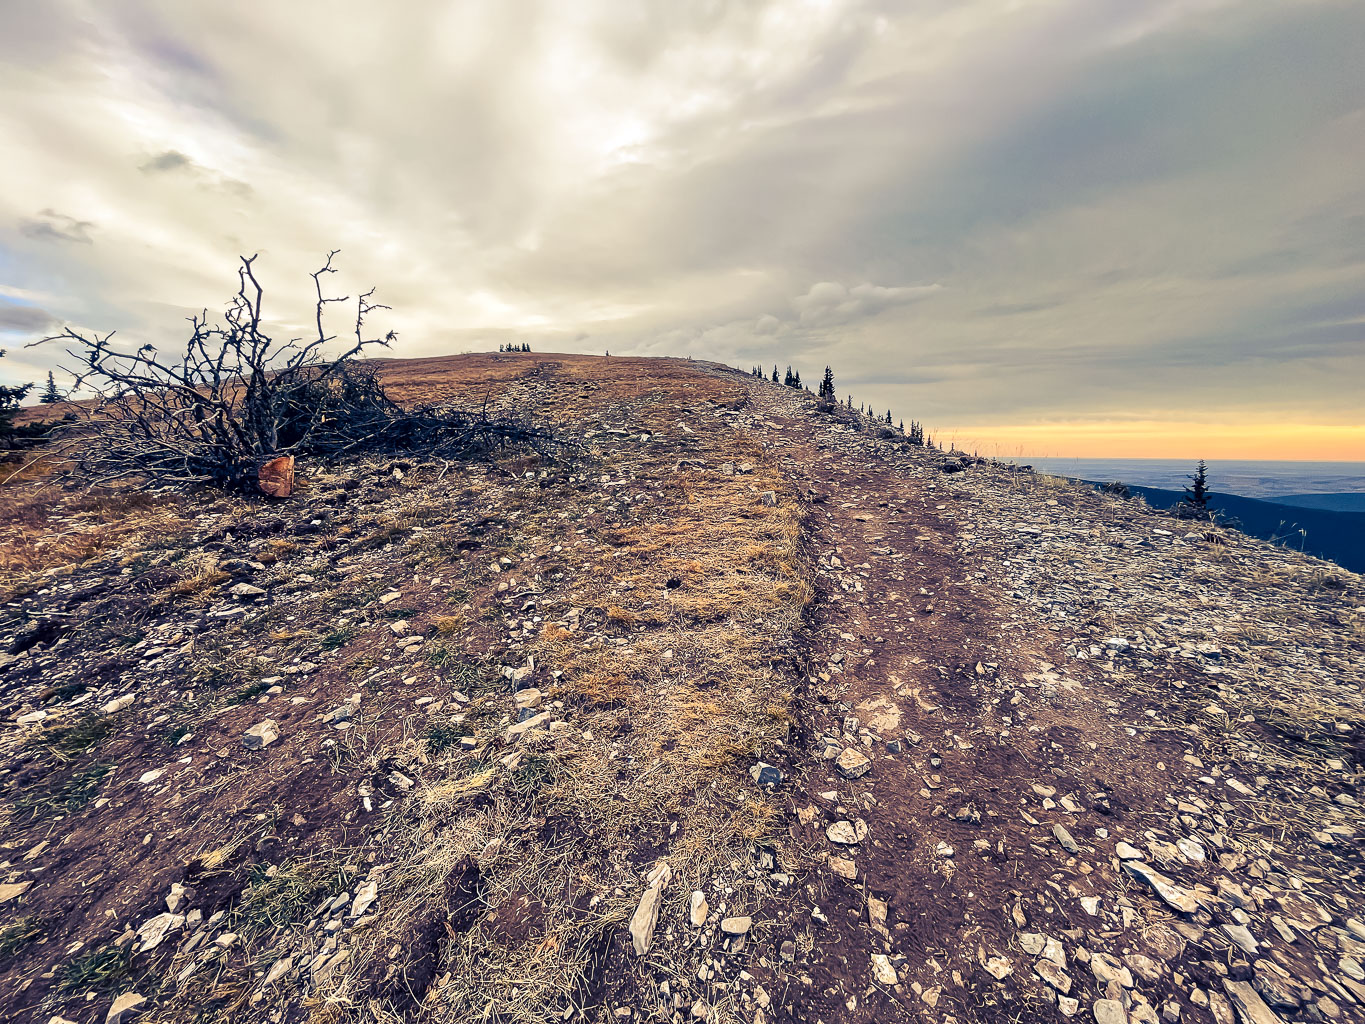
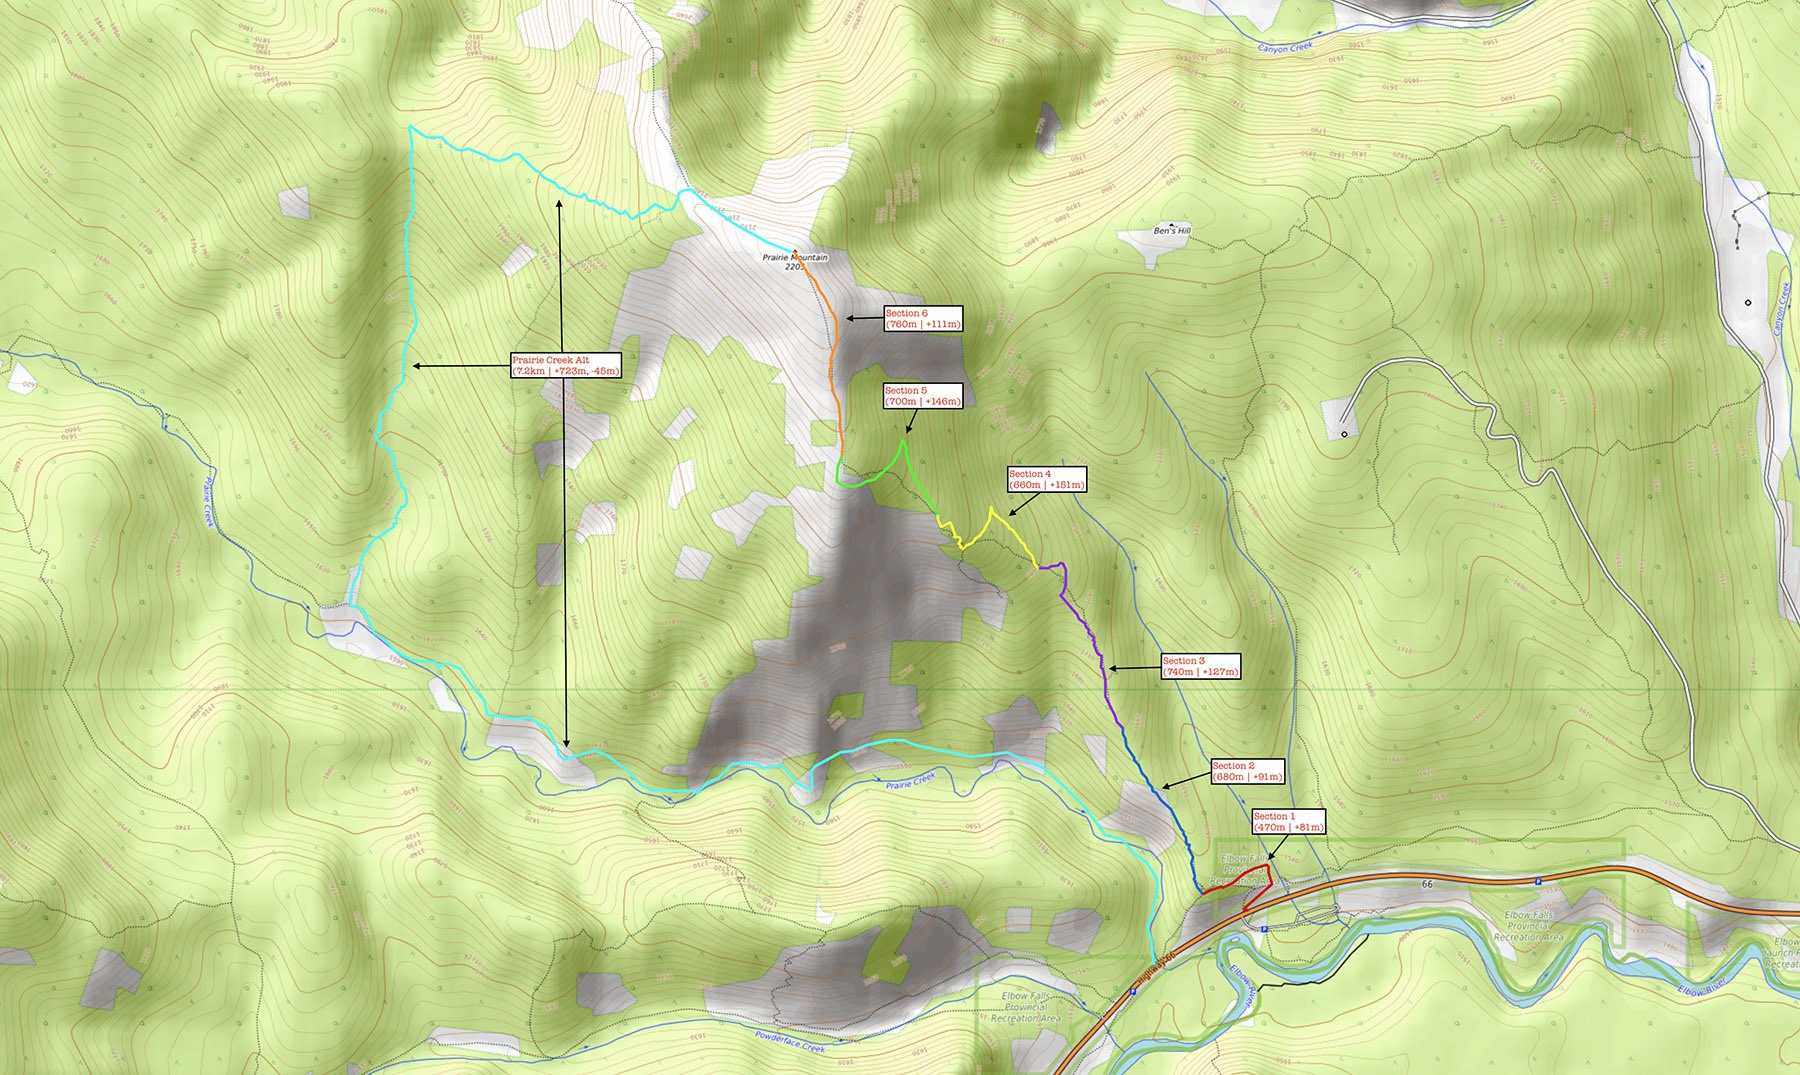
The direct route is the multi-colored line rising from hwy 66 on the map above. This is the trail that has been recently put in officially and is now a properly graded and drained route with signage and natural benches along the way. I break this route into 6 sections that are fairly easy to remember and help me mentally keep track of where I am on the route. The first section is vastly improved from before. It is a much gentler grade and a bit longer but quicker and easier to navigate. Section 2 (blue) is either pleasant or annoying, depending on your personality. I used to hate this section due to its length but now it’s only the 3rd longest. Most people like it because it’s not very steep. Section 3 (purple) ramps up the incline and will make you sweat – no matter your pace and it’s now the 2nd longest section and mainly treed. Section 4 (yellow) is now much longer than before and is the steepest section but still mainly forested unfortunately. It has some nice views off the ridge. Section 5 (green) is the 2nd steepest one but is now much safer than before with a much improved grade through forest. Section 6 (orange) can be either awesome or really, really tough depending on conditions. On a quiet morning with the sun rising over Calgary to the east it is a magical hike. With Chinook winds it can be a roaring hellscape of blowing snow and even rocks can fly through the air! It is the longest section.
![]() Pro tip – go up from the main trailhead (red) and come down the recommended Alt Trailhead (cyan). Climbing steeply is usually not an issue – it’s coming down that’s tough. As a related tip, if you are slipping and sliding around on the ascent you will be flirting with a disaster on descent. Either turn around or mentally prepare yourself for a tough and / or scary descent.
Pro tip – go up from the main trailhead (red) and come down the recommended Alt Trailhead (cyan). Climbing steeply is usually not an issue – it’s coming down that’s tough. As a related tip, if you are slipping and sliding around on the ascent you will be flirting with a disaster on descent. Either turn around or mentally prepare yourself for a tough and / or scary descent.
I know people who have ascended this route in under 40 minutes from the highway but a more realistic goal for people who aren’t fitness gods but are in good cardio shape is anything around 1 hour to the top. Most reasonably fit hikers take around 60 to 90 minutes up, but many beginners or people starting their fitness journey can take 2 or even 3 or more hours. Don’t race up (or down) Prairie unless you know what you’re doing. I realize it can be intimidating to see people running up and down like it’s no big deal, while you’re struggling to keep your heart in your chest but the good news is that you’re out enjoying the fresh air. Chances are almost 100% that most of the folks who make Prairie look like a Sunday afternoon stroll used to be just as out of breath as you might be. Try to enjoy the hike for whatever it might be for you. If Prairie Mountain is your Everest than you deserve more kudos than anyone else who ascends it. Everest’s take courage, easy walks in the park do not. Descent times vary greatly depending on conditions. 30 minutes is pretty quick while some might take hours if they don’t have the proper gear for the conditions.

Prairie Creek Route
My wife isn’t a huge Prairie Mountain fan (usually it’s too windy at the top for her enjoyment) but when she does come along she always pushes me to exit via Prairie Creek (cyan line on the map). Of course you can also approach via this route, but most people go up the direct and down the Prairie Creek route rather than the other way around. A circle route is always prefered for hiking because you get more scenery and in this case more distance and height gain as well. Ascending and descending the direct route is only around 8 kilometers with just over 700 meters of gain. Ascending the direct and exiting the Prairie Creek route is over 11 kilometers and 750 meters of gain. Often the Prairie Creek trail is much less icy than the much more popular direct trail and is also much quieter. On a gorgeous winter day I will often pass dozens and dozens of hikers on the main route and only a small handful along Prairie Creek. You should plan your trip with a bit more care if descending the Prairie Creek route for the first time. Have the route loaded into your GPS device so you don’t get lost. There’s almost always a trail in the snow during winter months, but with melting and during the summer it’s not obvious where to go with other tracks and trails visible along the Prairie Creek route.
![]() Pro tip – make sure you know what you’re doing if planning to hike or run Prairie in the dark. Search and Rescue are busy enough without worrying about people getting lost where they shouldn’t. Go up and down Prairie on Saturday or Sunday mid to late morning if you’re at all unsure about the route. There will be lots of other people around to help you out if you get confused on the route. (This still applies with an official trail with signs – in winter or in the dark everything can be confusing.)
Pro tip – make sure you know what you’re doing if planning to hike or run Prairie in the dark. Search and Rescue are busy enough without worrying about people getting lost where they shouldn’t. Go up and down Prairie on Saturday or Sunday mid to late morning if you’re at all unsure about the route. There will be lots of other people around to help you out if you get confused on the route. (This still applies with an official trail with signs – in winter or in the dark everything can be confusing.)
Prairie Creek usually adds about an hour to my total time on Prairie Mountain. This makes sense considering it’s another 4 kilometers. Plan according to your normal hiking pace and remember, there’s at least 50 additional meters of height gain along this exit. It undulates more than you might be happy about the first time you hike it.
Tip #3 – What to Expect (Weather)
There are multiple steps to planning your Prairie Mountain adventure and all of them will grant you a safer and more pleasant outing. Your plan should always start with the weather. I use the 2-day forecast for “Prairie Mountain” at SpotWx.com. Things to look for are cloud cover, precipitation, temperature (including the “Feels Like”) and wind. All of these factors go into the rest of your planning. See the screen grabs and read the captions below for an example of what this involves.
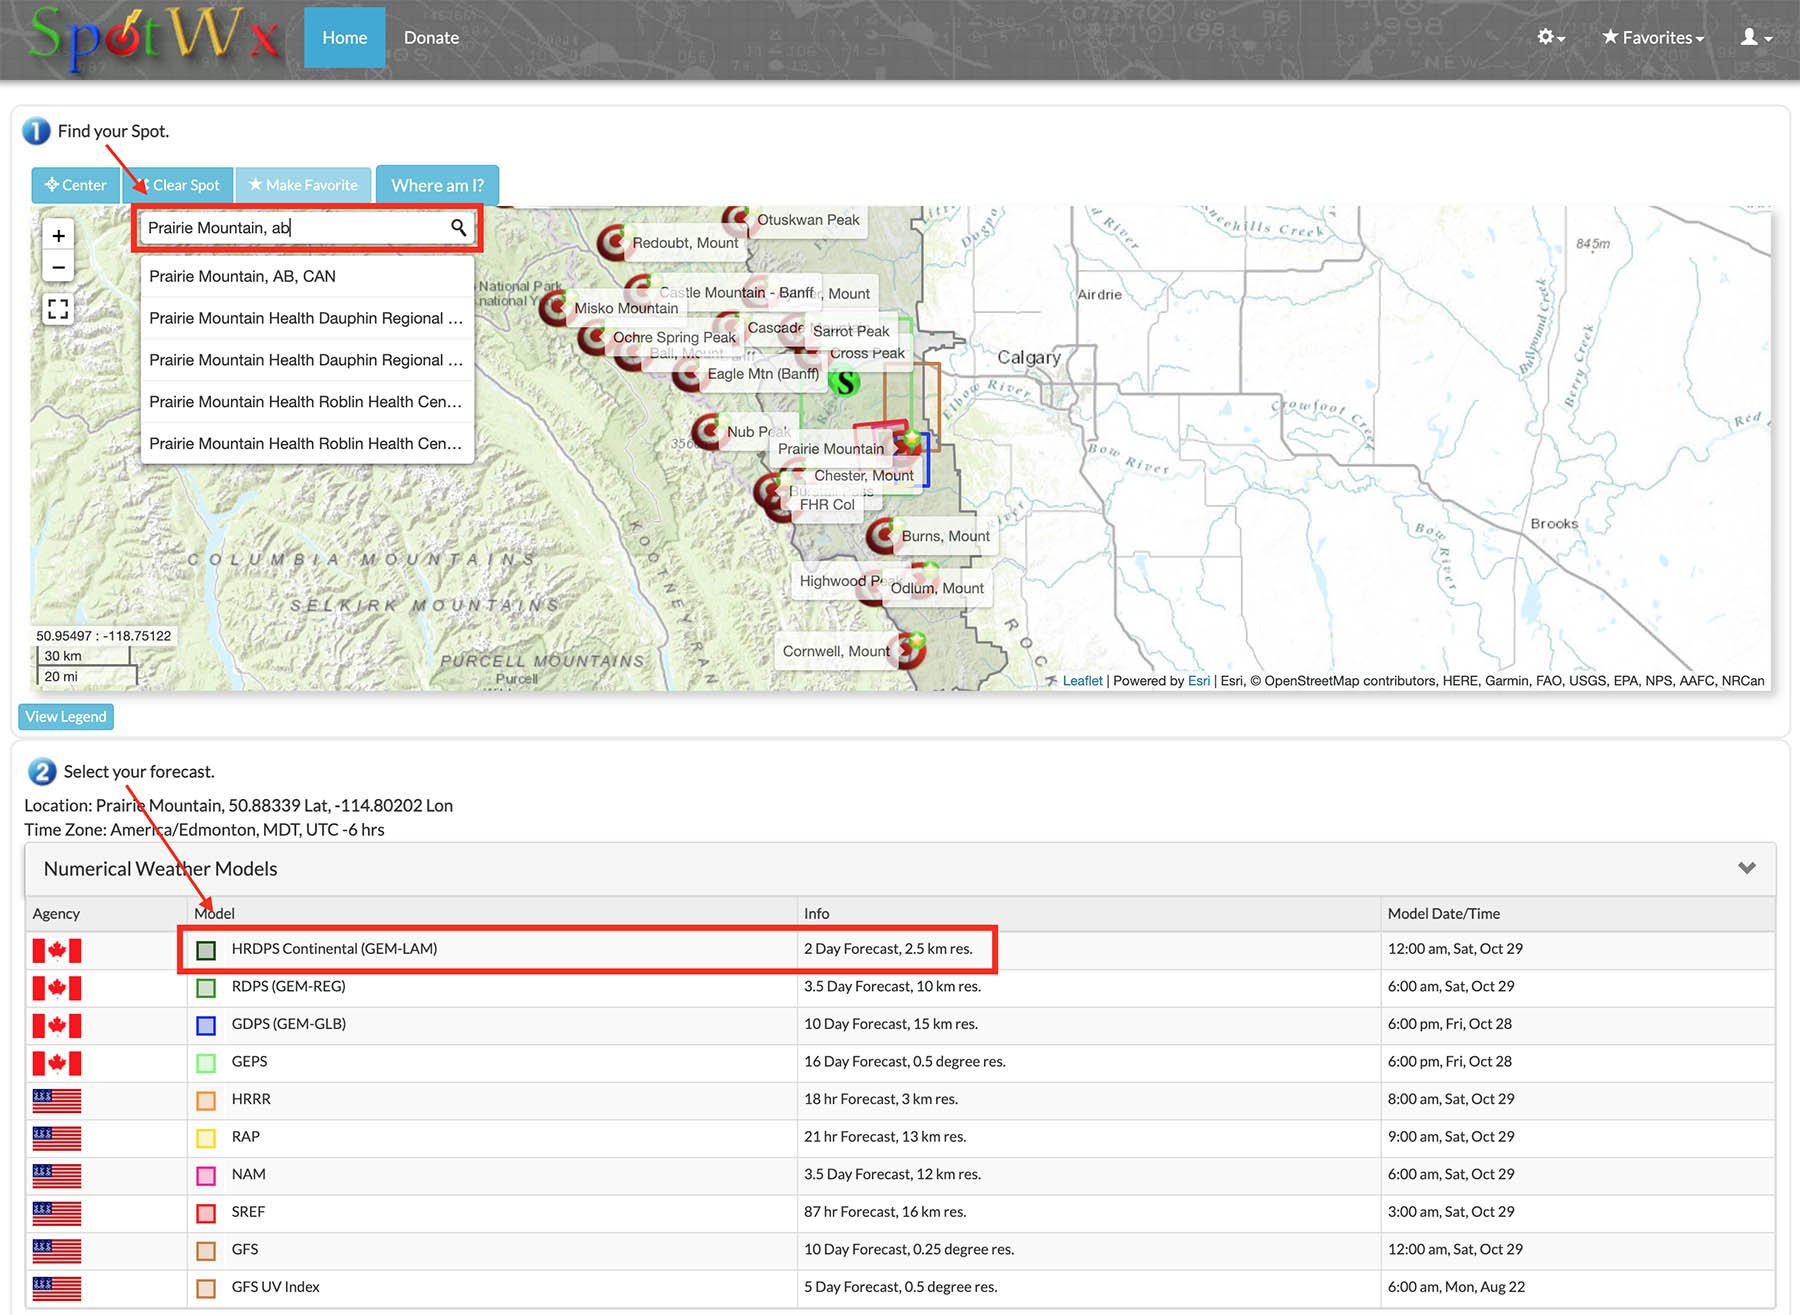


It can seem overwhelming at first but trust me, getting familiar with detailed forecast apps like SpotWx can be a life-saver in the outdoors and especially in the mountains. Apps like TheWeatherNetwork do their best but they aren’t geared towards people hiking 700 meters up a front range mountain.
![]() Pro tip – if your car is blowing around on the road and you can’t even see the mountain as you drive towards it, you are in for some nasty conditions. Don’t even think about heading up if this isn’t at least your 10th time on the mountain. You’re a bit of a dummy if you do head up in these conditions, no matter how experienced you are.
Pro tip – if your car is blowing around on the road and you can’t even see the mountain as you drive towards it, you are in for some nasty conditions. Don’t even think about heading up if this isn’t at least your 10th time on the mountain. You’re a bit of a dummy if you do head up in these conditions, no matter how experienced you are.


Tip #4 – What to Wear (Clothing & Footwear)
This tip is going to depend a lot on what kind of excursion you’re planning. If you’re hiking with aunt Edna and planning a tea break along the way you will be moving much slower than if you’re training for Everest or an ultra marathon. In general only you can decide how to dress for the weather that you’re expecting and your own experience, but here’s some guidelines.
- Don’t overdress. Take a backpack with extra clothes if you must, but you should start off cool at the bottom. You’ll warm up FAST – trust me. I see way too many down jackets on Prairie Mountain and the people wearing them are usually regretting it!
- Don’t underdress either. Lack of proper clothing combined with weather kills far more people in the outdoors than bears, cougars or pretty much anything else. If in doubt, take a pack with extras. The top is not going to feel like the bottom. Warm and sunny at the roadside can still mean a frigid hurricane at the summit.
- Bring a toque and gloves unless you’re very confident in a warm, windless forecast. Face coverings for wind, scarves and even ski goggles aren’t out of place in certain conditions. Wietse and I have been known to do laps in -30 degrees and trust me – you don’t want much skin showing at those temps!
- If you’re planning to go quickly, dress like a runner. The rule of thumb for runners is to dress at least 10 or 15 degrees cooler than the weather. For example when it’s -10, I dress like it’s actually +5 or even +10 depending how quickly I plan on going. This is inherently risky in the mountains but I’ve accepted this risk.
- If you’re planning to hike, dress like a hiker – whatever that means for you. Don’t dress based on what others around you are wearing. I’ve been in long underwear and my down jacket while people around me were running around in shorts. You have to know your limits and your preferences and your body.
- Unless you’re an expert on the Prairie Mountain grind, err on the side of caution and bring more than you think you’ll need the first few times you hike it. As you become an expert you’ll adjust your clothing and footwear needs.
- I’ve seen everything from flip flops to plastic mountaineering boots on Prairie Mountain. This is personal preference, but I wear runners with built-in gaiters and spikes in snowy or icy conditions and runners or approach shoes when it’s dry. For most folks out for a day hike they will wear whatever they would wear hiking or scrambling. If you’re completely new to the hiking or scrambling scene you should wear the sturdiest footwear you have with good grip. See the next section for a highly recommended bit of add-on gear for your feet.
Tip #5 – What to Bring (Gear & Food)
I see too many extras like bluetooth speakers and picnic supplies on the PM grind, and too few hiking poles and microspikes. Depending on conditions you should seriously consider the following gear (cheap options are available but you get what you pay for).
- Trekking poles, or at least one pole of some type. Four legs are better than two. That’s why Mountain Goats don’t walk upright until they get to camp. Simply put, any sturdy pole or set of poles will make your downhill journey safer, faster and much less prone to long-term wear ‘n tear on parts of your anatomy that really don’t like Prairie Mountain as much as your brain seems to enjoy it.
- Microspikes. These are required gear on the mountain when there’s snow or ice on the trail. Unless it’s guaranteed dry, you should always carry these in your kit – you can always decide at the car whether or not to actually bring them up with you. I can’t count the number of times I’ve seen accidents or near misses with people slipping and sliding down a treacherous track. Don’t underestimate how much these devices will improve your day on an icy trail!
- Unless you know what you’re doing (and if you’ve read this far you may not…), bring water and food as you would for any other 10km hike. You will see dozens of people like me doing laps without any food or water or even a backpack, but we are used to it and are taking risks by going so light. Again, as with clothing, you will adapt your food and water needs with subsequent trips. No need to get dehydrated on your first lap of the grind.
- I highly recommend that you bring your phone along with you on this hike. There is only cell reception on certain areas of the mountain but I’d guess about 75% of the route has coverage. Not only will you snap some gorgeous photos if you get lucky with the views, but you could be a life-saver for someone else who might need an emergency call.
- GPS device. This is optional and likely not needed if you’re ascending and descending the SE direct route on a weekend. BUT. Some people (i.e. my lovely wife and daughter) have a confusing sense of direction and like to wander off a perfectly good trail for no reason whatsoever. For people like that, you should definitely consider using a GPS. The good news? You almost certainly already have one in your pocket – a smartphone. I’m not going to get into the details of using apps like AllTrails or Gaia for navigation but suffice it to say that there’s lots of information out there on using these handy apps. Beware that AllTrails can be very misleading. I have been using Gaia for many years without issue on the latest iPhones. Contrary to popular belief, you don’t need cell service to use these apps but you do need to download the maps in order to use them offline. This usually includes paying something for their services, which IMHO is totally worth it. YMMV. If you don’t know what the two previous acronyms mean, you should likely stick to paper maps.
Tip #6 – Don’t be a Dummy
This is the section I likely should have put first. Many folks won’t make it this far because I tend to write way too much and people nowadays don’t like reading. (To be fair – this is mostly drivel so I don’t blame them.) If you have made it this far, please, please, please read the following ways to avoid being a dummy and prevent the glares-of-oblivion you might otherwise experience from those of us passing you as you commit the relevant faux pas.
Don’t slide down the uptrack on your butt. I can’t stress this enough – that’s why it’s in red font. There is literally nothing in the world as annoying as having a perfectly good set of kicked steps ascending the steepest sections of trail wiped out by mindless people sliding over them on their butts! Ok – maybe world wars, starvation and social media are a tad bit more annoying, but this is a VERY close 4th. I get it. You’re having fun in fresh snow and you forgot microspikes and now you want to enjoy the descent. What is more natural and fun for a Canadian then sliding down a hill on snow? But there’s a whole mountain of snow to slide down – you don’t have to be right on the well-defined track! Make a new trail, beside the uptrack, and slide down that one. Easy peasy.
![]() Pro tip – many people assume that sliding down a mountain on their butt is safer than a somewhat uncomfortable descent on foot. This is incorrect. Glissading is the alpine term for sliding down snow on your butt and you need to have an ice ax and know how to self-arrest in order to do this technique safely. Sliding down Prairie seems like a great idea until you go over a hidden rock or tree or lose control and slam into a tree and snap an ankle. All of these things have happened to others on this route.
Pro tip – many people assume that sliding down a mountain on their butt is safer than a somewhat uncomfortable descent on foot. This is incorrect. Glissading is the alpine term for sliding down snow on your butt and you need to have an ice ax and know how to self-arrest in order to do this technique safely. Sliding down Prairie seems like a great idea until you go over a hidden rock or tree or lose control and slam into a tree and snap an ankle. All of these things have happened to others on this route.
Pick up your dog’s poop – and bring it back down with you. I mean – do I really need to write this down? The number of plastic bags along the trail suggest that most people do, in fact, know how to pick up and neatly package the poop, it’s the carrying it back down the mountain they conveniently forget how to do. Don’t be a dummy! You put it in a darn bag – that’s the gross part. Now carry it down like the adult you presumably are. While we’re on the subject of dogs, if your dog isn’t familiar with mountains and hasn’t hiked off-leash with you before, please leave them on leash. Dogs have been lost on Prairie before and it’s tough finding them back!
Don’t make Prairie Mountain your first mountain hike. Mountains are tricky places to hike at any time of the year. Triply so in winter conditions. The weather is fickle, the terrain is unforgiving and there are many objective hazards that you probably don’t know about. I suggest hiking something a bit easier than Prairie Mountain for your first hike in the Rockies. Fullerton Loop trail is a nice start along hwy 22 and also a very popular winter hike.
Don’t ignore your body or your hiking partners. I know we’re all capable of anything in today’s world of participation medals, but many people underestimate the difficulty of the Prairie Mountain hike and overestimate their own fitness level. A wee bit of humble pie and patience will get you a lot further up Prairie Mountain than a whole lotta insta-bragging or ego will. If you aren’t feeling well, or if your hiking partner wants to turn around – go back down. Mountains don’t care about your ego – the sooner you learn this valuable lesson the sooner you get home at the end of a great day. Related to this, don’t be like idiot drivers who increase their speed as soon as my Prius passes them. Hopefully you can figure out what I’m talking about here.
Share the trail. Simple hiking etiquette says that people hiking uphill have the right of way and bikes must yield to hikers. On Prairie, the trail is 3 feet wide even though in winter the packed track is often much narrower. Don’t be a jerk – if you’re running downhill, simply go to the side and run down through the loose stuff. Don’t yell “heads up!” and expect me to stand aside and wait for you. The trail is wide enough that we can both keep moving.
Don’t vandalize the Canadian summit flag! Do I really need to spell this out? I know that some of you think our country is in the toilet but instead of being so negative with life, can’t you just find peace in the fact that you are healthy enough and have the freedom to enjoy hiking? You are also clearly rich enough to afford the drive to Kananaskis and have the gear to get to the top of a mountain. Stop throwing temper tantrums and let the rest of us enjoy this big, beautiful, free country. And leave our flag flying free too! (Yes, I know the wind usually damages the flag but I also know that humans do their fair share of the damage too.)
Do NOT go off either of the routes I’ve detailed above unless you know what you’re doing. There are objective hazards including avalanche risk on the east side of the mountain. Even if you see other tracks or other people going elsewhere, don’t blindly follow them or you could end up in deep trouble or worse.
Nice write up, Vern.
For me, living in NW Calgary I’ve got a training hill in my neighborhood, it’s a perfect grass 40m vertical. 700m would be 17.5 times and it’s a 5 minutes walk from where I live.
Question about microspikes. I have a couple of pairs but I prefer Salomon spikecross 5 goretex, they have titanium spikes mounted on the soles. Have you ever tried them? They seem better then the chains with spikes.
Im going to need to eventually decide to ascend this rad route 😀
That poor old mountain truly never gets any peace.
I couldn’t sleep one night last winter, so I went out there at 3:00 in the morning on a weekday to get some cardio and solitude. I figured that there was no way I would encounter other humans at such an odd hour.
Nope. There were three or four other headlamps ascending the normal route ahead of me. It’s crazy.
Yeah it’s nuts. I can see why some people bemoan the overuse but in winter we have less impact.
Disappointed to see your post showing the unofficial green trail head all the lazy people take and contribute to erosion and a mid fest. You have not identified the main trail head that’s been in place for decades with a nice Little Rock step start off the red start (which should be decommissioned). Of course there is now a trail the strata crew has newly cut beside the rock step so they can run the entire way down. With tree slashes and paint and short cuts, prairie has turned into a mess though on a positive there is very little garbage on the trail considering. Can’t wait to see this place when we have 2 million parasites/people in Calgary.
Parasites / people? Sounds a bit bleak to be honest. 🤔 I think we’re pretty darn fortunate to live in such an unpopulated place compared with most of the world.
I have a few more healthy years left and won’t apologize for leaving my house once in a while to recreate in the hills. And if I’m doing it, I can’t really fault the rest of humanity for doing it too.
Of course I try to be a good steward but nobody is perfect all the time. Apologies for that I guess?
YMMV. 🍻
Want to leave this app suggestion for iPhone users…. super lightweight, free, offline maps – the closest to a physical GPS device without all the other app bloat – and maintained by a single guy here in Canada using trail data and official topo map data from the government:
https://apps.apple.com/ca/app/topo-maps-canada/id392857820
Hey Vern. Great PM4 Dummies post! It’s slightly odd to connect virtually – I’ve only ran into you on PM once this year so far. A guy I met today on trail said that PM was going to be shutdown on May 1 for trail maintenance for 5 months. Have you heard anything about that? I haven’t been able to find any info online.
BTW, I managed to break the Karman Line on PM in 2022. 151 trips for an elevation gain of 105+km…but who’s counting… 😉
Hey man! Good to hear from you! I see you found me online. 😏 I’m answering you while ascending pm for the 68th time this year. 😂 I have heard rumours of the upcoming closure. All we found was an article at https://www.merx.com/public/supplier/solicitations/notice/22688012360/abstract?origin=0.
Personally I’d be surprised if it’s only closed five months.
Thanks for the update. 4 months of other options it is! Maybe I’ll see you on the West Side Story trail…some additional distance for my new 1yo Labradoddle. 🙂
Hello Vern,
Love a lot of what you wrote here. Nice seeing you often on the trail, too.
Thankfully, the trail maintenance work took LESS than the anticipated 4 months and opened up in early Sept. Unfortunately, I didn’t find out until the END of September!
Regarding dogs, perhaps you may want to include these 2 thoughts:
1) If you know your dog is prone to nipping at people, LEASH IT! I had two of my children nipped at by one idiot’s border collie (a breed known for nipping) on two separate occasions. Yep, same dog, “Crystal” I think the name was, actually bit my oldest daughter and the next year nipped at my youngest daughter. Off leash both times.
2) Regarding pet poop, for the love of all that is decent, STOP HANGING YOUR PET’S POOP FROM TREE BRANCHES! Try doing this in your own house on your Christmas tree and you may begin to understand why this is uncouth and uncalled for.
Humorous (?) anecdote: I witnessed a guy who watched his very large dog do a very large #2 right at the east TH and then didn’t pick it up. I yelled after him, “Hey! Are you seriously not going to pick that up?” He pretended to not hear me and went up the hill to where his GF was waiting for him. She ended up coming down the hill to pick it up (honourable, responsible) & when she got bk up to him, I clearly heard him say to her, “You’re carrying that all the way?” Oh, that she’d have thrown it at him! Fortunately, my son and I were going up the Ben’s Hill route and didn’t run into them again.
Happy trails!
Thanks for the comment and story. Agree 1000% about the dog poop bags. I cannot for the life of me figure out why people leave it hanging from tree branches and then forget to bring it back down with them. Most likely they can’t find it back on return so the rest of us get to look at for weeks on end.
Awesome write up. Describes Prairie to a T. Despite all the issues, I ❤️ Prairie Mt. I’m usually one of those guys flying down the mountain; but do try not to scare people when passing. I’m sure I’ve not done a great job sometimes given how many people I pass on a double or triple 😂.